Cole: I always gave into the concept that if you recorded at higher sample rates then it sounds better. Some people I considered to be good engineers actually said if you can record 96khz then do it. If you don’t mind me asking how did you come to the conclusion of keeping the sample rate of your sessions at 44.1khz instead of using higher sample rates like 48, 88.2, 96khz? From what I know, you can’t record both at 48khz and 44.1 at the same time so it would be a bit difficult to a-b the two right?
Its kinda difficult to explain and also really depends on what kind of project you are working on. Certainly their are situations that warrant recording at a higher sample rate. But, 90%-95% of the time when recording, especially in genres where live instrumentation isn’t really used or needed, it is better to remain at a sample rate of 44.1khz. To help explain, first, i think it’s best to fully understand what digital audio really is.
So, essentially you have to think of digital audio as the summation of a lot of math equations, those equations coming from the process of converting an analog signal to a digital signal or what is commonly known as A/D. The architecture of those equations are determined by both sample rate and bit depth, which i’ll explain shortly. The final sum of those equations (which we call an audio file) is never quite a perfect answer, its always some kind of number with a lot of decimal points to it.
What makes the math imperfect is the fact that the sum is usually a number that is a rounded result from all the equations occurring in the process to convert an analog signal to a digital signal. The accuracy of the mathematics occurring is determined by the quality of the A/D process done by a device called the A/D converter, which you would also know as your Audio Interface. Depending on the actual quality of your A/D converter, the amount of decimal points that the sum will assume can either be short or an extremely large value. Top of the line A/D converters, the ones that cost as much $12 grand and higher, round out the sum of these math equations to a trillion or more decimal places, which means the sum is going to be a lot lot more accurate and detailed. Low end A/D’s round out these equations to a few hundred or thousand decimal places, so the sum is just not going to be as accurate and detailed.
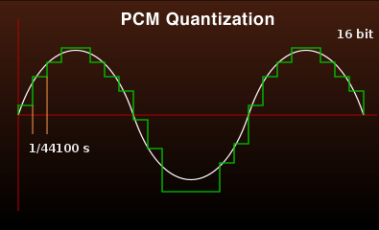
So what exactly is ‘the sample rate’? In a comparative ‘simple’ explanation, it essentially is a consecutive series of snap shots over a specific duration of time like a video or motion picture. But we’re not talking about video, we’re talking about audio. What defines the sample rate is how many of these snapshots of audio occur in the duration of 1 second as well as how consistent the interval between each snapshot is. So what 48 khz really means when you break that number down is that their is 48,000 snapshots of audio in 1 second. 44.1 khz means that their is 44,100 snap shots of audio in 1 second.
It’s also helpful to understand what ‘Bit Depth’ is as well in this conversation. Once again, to make a comparative ‘simple’ explanation, ‘Bit Depth’ represents how detailed each one of these snapshots are, kinda of like the amount of colors in a photograph. Black and white photos represent the lowest bit depth, and photos of many millions of color combinations represent the highest bit depths. Once again, since we’re not actually talking about photos, the details we are talking about in each snapshot of audio is decibel level steps in the frequency range of human hearing, which is between 20hz-18,00khz.
16 Bit audio has 65,536 steps while 24 Bit audio has 16,777,216 steps. Essentially, 24 Bit audio has 256 times the number of potential amplitude steps as 16 bit audio.
Now that we roughly know what digital audio, sample rate and bit depth are in terms of how they are defined, we can go back to your original question about why i mostly choose to record and work in a 44.1khz, 24 bit format as opposed to a higher sample rate and bit depth in our DAW.
You have to think of the A/D converter as essentially a sonic camera. You can kind of compare recording digital audio through different quality A/D converters to animating photographs from different kinds cameras. A really top end camera is going to take a high detailed snapshot, and obviously a cheaper consumer camera is going to take slightly less detailed snapshot. If you were to take 48000 snapshots in a row super quickly and animate those snapshots, its pretty clear that the animation of the snapshots from the top end camera is going to look way better than from the animation of the snapshots taken from the consumer camera. The same would apply if you were to take 44100 snapshots.
So now in the conversion process of converting audio from 48khz to 44.1khz, essentially we have to remove 3900 snapshots of audio to get from 48 kHz to 44.1 khz. But which snapshots are we going to remove? And when we remove those snapshots, what happens to all that extra space that was now created. The interval between each snapshot is not going to be consistent anymore. It would go something like, snapshot snapshot, missing snapshot, snapshot snapshot, missing snapshot instead of just snapshot after snapshot after snapshot. Because we had to remove those 3900 snapshots, if you were to animate the remaining 44100 snapshots back what you would see back is going to be less smooth and consistent. Totally not representative to what the animation of 48000 snapshots would look like because the intervals between snapshots wouldn’t be the same. So essentially converting audio down from 48khz to 44.1 means you are removing information from the 48khz file to make it a 44.1khz file. Anytime your removing information from an audio file like that, the end result is not going to be the same as the original audio file, even if its only the slightest of differences.
So thats why i keep everything at 44.1, so i’m not losing any tiny pieces of information from the audio file in the conversion process. Hope this is somewhat understandable.
Today, we are going to comment on a very common inquiry we get from many young producers who come through our studio in Chicago and book time. It is the question of whether it is useful or not to go to an audio school to pursue a career in music. With so much of the younger generation discovering a passion for music production (largely due to the affordability of powerful audio & production software), the natural move for a small percentage of them is to want to make a living engineering and producing music full time.
So just like many careers out there, the natural logic is to presume a degree is needed not only for the skill and insight but for the resume, proof of effort, etc. In addition, the idea of going to school to learn how to play around with mixing consoles, top end audio gear and microphones is pretty enticing. So if you’ve toyed around with these questions, let us give you a few thoughts to take into consideration. Remember, the ultimate decision though is up to you and no one else, don’t ever forget that.
No Degree Is Needed To Make A Living In Audio Engineering
We’ll just get right to the point here. No degree is needed to make a successful living recording, mixing, mastering, or producing music. As a matter of fact, it wouldn’t be all that shocking to discover that most of the top level audio engineers currently in the field didn’t go to school for a career in audio. It would even be fair to say that a decent amount didn’t even go to school at all.
Audio engineering and music production is not just a field of study. It is an artform, a craft. The typical method of training for a career in audio is an internship where an aspiring engineer learns and works under a seasoned audio engineer, studies and actively employs his or her techniques and philosophies in order to one day develop into a skilled successful engineer. Its been like this since the earliest days of recording. The two things that matter most in this business in order to induce ultra success are connections and experience. These days, one can go to any studio around the world, beg like a dog for an unpaid internship, and start the long and somewhat brutal process of planting one foot in the door. Of course you’ll make a lot of coffee, clean a lot of toilets and answer a lot of phones, but its all for that one day when you might be able to assist a session for the first time or be relied upon to edit some audio in Pro Tools before an important mix. Then before you know it, you’ll be sitting in more sessions, learning more techniques, asked to do more important things in order to make the engineer or engineers lives that you are interning under exponentially easier in the studio.
Go To School If You Can Pay
With all that was just previously said talking down the idea of going to school for audio engineering, a college education can be invaluable for an aspiring young engineer, giving you hands on experience with recording equipment and real world situations commonly found in most professional studios around the world. You see, its more than just recording and mixing. It’s learning the process to meet deadlines, proper session flow, understanding your clients or client psychology, the art of effective promotion, business management and so much more. Some of these things can be hard for an intern to learn in the studio. Having a firm grasp on all these concepts before beginning what is the usual mandatory internship makes it easier to get both feet in the door at a studio and thrown into everyday studio life.
The one unfortunate thing about going to school these days is the amount of money that one must shell out in order to get that piece of paper at the end that confirms you did it. So if you have the money to go or your family or relatives are willing to pay for it so you don’t have student loans, go to school, it would be silly not to. The amount of people you’ll meet, relationships you’ll develop, and life experiences you’ll have are ultimately important for personal growth and development. And you can apply these life lessons and relationships to the world of professional audio. Good people skills and relationships can lead to more networking, more networking can lead to more connections, and more connections can ultimately lead to more clients and business.
However, if you have to take out loans to go to school, it’s tough to advocate putting yourself in serious financial debt for a degree in audio. Why? At the end of the day, the sad fact is that even with an esteemed degree from a top college, you still have to be accepted into the school of ‘hard knocks’ as an intern in a recording studio. As we said before, the education should help give you a one up with your experience and knowledge over the rest of the interns. Engineers may turn to you more often to assist or sit in on their sessions, but that’s not always a guarantee. At the end, you’ll have to ask yourself if its really worth spending all that time and money on a degree only to do what you could have done for free without that certified piece of paper.
So in summary, going away to school for an education in audio is a great thing. As we said before, the relationships you’ll build and life experiences you’ll have are not only important for self-development and growth, but they will also help out in the real world environment of professional audio. However, not going to school shouldn’t be the excuse one uses for not pursuing a career audio engineering. Going back, most top-level engineers didn’t go to school for audio. They got in the door and advanced their careers because of their motivation, dedication, hard work ethic, reliability, and personality. They also advanced their careers because of their extraordinary hearing abilities. All these qualities are vitally important in the profession of audio engineering and can’t necessarily be learned in school. Plus, a seasoned engineer might be more willing to take a chance on a person with these qualities versus someone with a degree. You’ll never know though until you give it a try.
9 times out of 10 in the studio, the most frequent question we get asked on an everyday basis would have to be “what are you doing to the vocals to make them sound so good in the mix?” Sometimes clients word it a little differently, but it all leads back to the same question
Here at Studio 11, we mix a new rap vocal anywhere from four to six times a day — much more if there are multiple rappers on the same track. Over the years recording and mixing rap and hip hop in Chicago, we have developed an approach that genuinely works, and works extremely fast. In fairness, we understand that all songs, their track makeup, vocal styling and performance can be quite different. Truthfully, there can never be one formula to mix all vocals effectively. In the genre of rap and hip hop, there are many approaches to conceptualizing a vocal treatment. Ours is just one of many.
The Approach
It all starts with the approach. We say this time and time again, and every time we say it, it only gets more true: in order to mix anything music related, you need an end game. There has to be some kind of idea of what the song is going to sound like when it is finished, where the vocal is going to go sonically in the song before you start getting it there. More than likely, your initial approach can and probably will change along the way, but there has to be some kind of guiding direction or else why do anything at all.
The biggest issue most people have when mixing rap vocals is that they think of the word “vocals” without considering the word “rap.” Rap is a supremely general term — there are big differences between 1994 LA style rap vocals and 2015 Chicago style rap vocals.
The point being, when it comes to mixing vocals, the ‘what’ and ‘why’ are just as critical as the ‘how’. Important things to consider before the mix are: what is the artist’s style, where is the song being played, who exactly is the artist’s audience, and how can you, the engineer, tie all that together and bring the song to life?
So that you have an overall approach to the song, how exactly do you get it there?
Cleaning Things Up
After all the rap lead’s, overdubs, and adlibs are recorded in the song, many of them are going to need a bit of cleaning before the mix process can begin. There are many related issues that can occur during any given vocal tracking session.
One common issue we hear all the time when clients send us projects to mix is their vocal tracks were recorded in a terrible spot. One such place is the closet (we get that one a lot) or in the crapper. We know its crazy, but a legend has gone around that it’s a good idea to record in a closet or bathroom. Lets be clear, it is never a good idea. However, if a closet receives the proper acoustic treatment, it can work just fine. But only with proper acoustic treatment is it possible.
The other common problem we get all the time from our clients is that the vocal tracks were recorded too hot or are clipping. Again, a myth has persisted that it’s a good idea to record the vocal signal or any signal for that matter as loud as possible. This is completely not true, particularly in the era of 24-bit audio.
Cleaning things up can be a little rough sometimes because the capacity of what can be done to the audio in question can be quite restricted. One useful tool for audio files that are clipped out is iZotope’s distortion removal software called Rx De-Clipper.
Another thing to keep in mind is the distortion on the audio file will create resonances in the center frequencies. This can be corrected with precise parametric equalization.
For vocals recorded in reverberant spaces, subtle gating, expansion and careful equalization can contain the sound of the room — or you can use software like SPL De-Verb. Another trick we incorporate is to mix the track in a way that utilizes the reverb printed with the vocal. A good way to do this is heavy compression
For vocals recorded in closets or corners, the main issue will be comb filtering.
One simple idea we use for reducing comb filtering is if there are doubles of the vocal, pitch shift each one up or down a slight amount. This will slightly alter the frequency bands that are being filtered, so that when stacked with the main vocal, the same bands will not be missing entirely. The doubles or overdubs will “fill in” the missing frequencies. At the end of the day, the comb filtering will still be there, but it won’t be as noticeable.
Another noticeable problem we frequently get when clients send us projects to mix is that the vocals will be poorly edited, containing clicks, pops, noises, jumpy or unnatural cuts. At Studio 11, we always go through all the vocal tracks one by one and delete the dead space and fix all the editing so each performance is as smooth and natural as possible. If the breaths are real loud on the vocal track you might want to gain them down or delete them. If the vocals are stacked and there is no particular lead, the best idea is to just delete the breaths all together.
Lastly, if the artist is in the studio with you for the mix process, it might be a good idea to mention these problems to them if they exist and just rerecord all the vocals or just the ones that are in question.
The Power of Processing
Now that the vocals have been cleaned up (or maybe they came in clean to begin with), it’s time to decide what to do with them in the mix.
Now, its not really our style to tell you how you should or should not process the vocals in your mix, but we can give you a couple of pointers to consider and think about.
B-B-B-Balance
First and foremost, when it comes to mixing Rap and Hip-Hop, especially Chicago Rap and Hip-Hop, it is extremely important to understand and figure out the relationship between the vocals and other instruments that fall in the same frequency range.
Typically, Chicago Rap and Hip-Hop is all about the relationship between the level of the vocals and drums. The number one contender with the voice is usually the snare. Discovering a way to make both the vocals and the snare prominent and pocket without getting in each other’s way will make the rest of the mix fall nicely into place.
Rap and Hip-Hop vocals generally do not have much in the way of reverb.
There are three main reasons for this:
1. Rap vocals tend to hold more of a rhythmic function and generally move faster than sung vocals — long reverb tails can smear the rhythm and articulation and even dull out vocal presence.
2. Typically, the idea in Hip-Hop is that the vocal needs to be “up front and in your face,” whereas reverb tends to push things back into the stereo field.
3. All the dogs and cats are mixing vocals that way. Not necessarily an okay reason, but resonates with truth.
However, Rap and Hip-Hop vocals usually do profit from a slight sense of three dimensional sculpting, or what is known as “air.” This is a sense of space around the vocal that makes it more vivid and exciting. Very small, wide, quiet reverbs can really do the vocal a lot of justice here.
Another thing that we do that helps out a lot is use a small amount of delay (echo), keeping it in the background, with a lot of high-end rolled off. This creates the sense of a very deep three dimensional space, which by contrast makes the vocal seem even more present and forward.
Lastly, if you are recording the vocals in a really nice professionally designed tracking room, carefully bringing out the natural space of the room on the vocal track can be a good way to add a bit of “air” and realism to super dry vocals.
Mid to heavy compression with a very fast attack, relatively quick release, and a boost to the super-treble range can often help accentuate the natural “airiness” in the vocal.
Consistency and Shape
A little compression often works well with vocals, just to tame them, place them into a mix and add a smidge of tone.
On a mix with few tracks, a small amount of compression will usually get the job done, unless you are truly going for that over-compressed sound where there is little dynamics. However, the most common error most people do make when processing Rap and Hip-Hop vocals is over-compression. Extreme levels of compression really only works well within in a mix when there is a lot of stuff fighting for frequency space. When you hear about rapper’s vocals going through three different compressors it’s probably because there are many things already occurring in the mix, and the compression is necessary for the vocals to cut through. Or because it’s a stylistic choice to really crunch the vocals and get that over compressed ‘in your mouth’ kind of sound.
Filter Cats Ho!
What’s happening around the vocals music wise is just as important to the vocals as the vocals themselves. Carefully choosing what frequencies to keep and get rid in the mix is very important in helping the vocals sit or pocket just right. For example, a lot of engineers choose to high-pass filter almost all the tracks in the mix except the kick and bass. That helps create room for the low frequency information. Often though, the importance of low-pass filtering is overlooked. Synthesizers, even bass synths, can contain a lot of upper frequency information that just isn’t needed in the mix, leaving the “air” range around the vocals feeling stuffy.
A couple of well utilized low-pass filters could very well bring your vocals to life.
Also, a little more on high-pass filtering, unless you are going for that thin mid rangy thing, you really don’t need to high pass filter your vocals past 120-130 Hz. Both the male and female human voice has chest resonance that on average goes down to 80 Hz (and sometimes even lower). Try applying a moderate high-pass filter at around 70 or 80 Hz to start with if you’re just trying to clear up the vocals. This will usually remove any microphone boom that might be on the vocal track or tracks. This will definitely your low end instruments push through the mix better too.
Presence not Presents
Deciding where the vocal sits in the frequency spectrum is important. Mid heavy vocals (telephonic sound) can be really cool at times, low-mid “warm” sounding vocals certainly have their place, add charm, and moisten panties. Most of the time, we like to hype the natural presence of the vocals through subtractive equalization of the “throat” tones and proximity buildup which generally occurs around the 230-650 Hz range. As a result, this will over exaggerate the head and chest sound— particularly the consonants that form at the front of the mouth, tongue, and teeth — which is what we use to pronounce our words. These consonant sounds generally live in the upper midrange (2k-5k).
Although these are the methods we use to get vocals to stand out in a Rap or Hip-Hop track, at the end of the day, there really is no correct way. Remember to use your ears, because as long as the client is happy and the mix sounds good and translates, then you, the engineer did his or her job. Then maybe just maybe, someone will throw you a cookie at the end of the session for a job well done. Studio 11
Here at Studio 11, recording and producing the mixtape is what we do day in and day out. It’s an everyday occurrence, kind of like tea-bagging and the pudding dip, but that’s another story for another day. Over the last 17 years, we have recorded, mixed, and mastered close to 2000 different mixtapes for various rappers from Chicago and abroad. The writing is actually on our walls (come see for yourself). You’ll find that we have way more than a lot experience in the whole mixtape game. One thing that all this collective experience has taught us, it takes more than a well-produced mixtape to be heard. It takes a concerted effort from the artist, his or her manager, friends, family and even the fans. Here in this blog, we’ll discuss 5 detailed steps to producing, marketing, and promoting your mixtape so you can obtain the best and most impactful response out of its release.
Find The Right Studio
The first step on the journey of putting out a mixtape is finding a good studio in which to record your mixtape in. It’s important to find a studio that you are comfortable recording in, who understands your vision, and produces amazing sounding records. Always try and find out as much as you can when looking for a studio to record in. Who has worked in the studio before, what is the quality of the sound the studio produces, what is the speed of their workflow. Once you have found a studio you like and reserved the time you need, make sure that you come fully prepared. Write your rhymes at home to the music you are planning on recording to. Make sure all the lyrics you’ve written are memorized and well rehearsed before you arrive at the studio. Before you get to the studio, double check that you have all your beats with you in the best quality and format possible. It’s also important to have a back up plan just in case whatever device you brought your beats on such as a hard drive or cd doesn’t work.
Get A Good Mix and Master
After all the songs have been recorded, the next step in the mixtape journey is the process of mixing and mastering. To simply put it, mixing is defined as the process by which multiple sounds are combined into one or more channels. In the process, the source signals’ level, frequency content, dynamics, and panoramic position are manipulated and effects such as reverb may be added. This practical, aesthetic, or otherwise creative treatment is done in order to produce a mix that is more appealing to listeners. Always make sure your mixtape is cleaned up and mixed by a professional engineer who is experienced and knows what he or she is doing. Make sure that the sound is clear and crisp and that the sound levels are balanced throughout your mixtape.
Hire A Graphic Artist
When hiring a graphic artist to design your mixtape cover, make sure they understand your music and brand and that they can bring your ideas to life. Also be sure that they can bring forth their own creative cover ideas that will represent you and your mixtape effectively. So, with that being said, here are three tips to consider when hiring a graphic artist to design your mixtape:
–Versatility: When choosing a graphic artist, make sure that they are versatile, creative, and have a wide range of design skills. The main thing is you want someone who can convey your individuality and the themes and messages of your music, not someone who has a pre-designed approach to designing mixtape covers.
–Track Record: Request to see work they’ve done in the past. Additionally, when you’re hiring for services, such as PR, marketing, or website design, check track records too.
–Professionalism: We know that the hip-hop/rap industry can be a little casual, but business is business. Make sure you have a timeline for the design job and ask that the graphic artist is being consistent and communicating effectively with you throughout the design process.
Use Social Media to Promote Your Mixtape Release
–Engage: Follow other hip-hop artists, both established and up-and-coming, who have similar followers and fan bases. Additionally, follow DJs and other hip-hop influencers’, such as hip-hop editors, bloggers, etc. Keep track of who’s talking about you.
–Fan Promotion: Constantly engage with your fans and include them on your journey. For example, you can ask fans for opinions regarding the title of your mixtape, which track to promote, mixtape cover art, etc. Join their conversations; don’t just always flood them with links pertaining to your music.
–Plan: Plan an overall strategy so you do not get distracted from the main goal.
Find a DJ
When starting out, especially if it’s your first mixtape, don’t just look for DJ’s who are established to play your music. Go out and find Djs who are up-and-coming and who will truly believe in your music. The more Dj’s that have it, the more chances your mixtape will have to be heard. Power of the masses!
This list covers the overall basics. However, it is important to mention the viability of building your fan base prior to releasing your mixtape. Creating anticipation and hype prior to the release helps bring mystique and excitement to you as an artist and to the release as a whole. Don’t be cheeky, create that buzz!
Here in Chicago, it is well known that we like our women dirty and our music even dirtier. So is it really worth it to record and produce music in Chicago or anywhere else at a high resolution when it is meant to sound raw and lo-fi, like hip hop and rap. While many audio engineers and producers would say there is just simply no need to, more and more of them are beginning to realize the benefits of higher resolution recording such as 96kHz and 192kHz. And I too realized it after eating two Chicago style hot dogs and one polish. You can too, so listen up!
Wandering away from the times of DADC (digital audio data compression), collectively the questions of why high sample rates could benefit the consumer delivery platform becomes increasingly important. We inside this audio community struggle with the notion of using sample rates that improve fidelity outside the limits of our ears. Why can’t we just stop at the 16 bit, 44.1 kHz digital format. 16 bit gives us the dynamic range to mask the noise floor while 44.1 kHz gives us the full 20 Hz – 20kHz frequency spectrum our ears can discern. Wasn’t the conclusion Phillips and Sony made back in the day good enough? A CD’s sampling rate and bit depth delivered the best sound possible over any other digital product. The answer today in the year 2014/2015 would be no.
High-Resolution Audio systems offer the assurance of an extended high-frequency range. These digital systems now operate at 2 to 4 times the sample rate of the standard CD. This means that these systems have the ability to extend the playback frequency range well above the 22 kHz limit of the standard CD. Does this added high-frequency range really improve the quality our listening experience? Yes, it definitely will. The problem is that High-Resolution Audio will only arrive when all the components in the playback chain can equal the resolution of playback.
For example, lets consider a digital audio playback system consisting of a CD player, preamp, power amp, and speakers. If each component has a frequency response of 20 Hz to 20 kHz, is this good enough to reproduce all the frequencies we humans can hear? The quick answer is no, and here is why.
An audio system’s real frequency response can be understood by adding together the frequency response of each component in the audio systems chain. If we look at our example above, we have four components total in the chain: CD player, pre amp, power amp, and speakers. If each component is -3 dB at 20 kHz, then in total, we have a system that is -12 dB at 20 kHz. Because this collective curve is so steep, it will begin to affect the audible high frequency information we humans hear, measuring at -4 dB at 10 kHz, -.66 at 5 khz, etc. In conclusion, this system will not even come close to matching the performance of what our ears can do.
So, if we want to accurately reproduce audio at 20 kHz, the frequency response of each component must continue well past 20 kHz. Is this what you call excessive and unnecessary? To argue this, let’s change each of the four components in our example above with components that have a 200 kHz bandwidth. Combined, the audio system now measures – 4 dB at 100 kHz, – 0.8 dB at 50 kHz, and close to – 0.2 dB at 20 kHz. This simple 4-component signal chain achieves a 100 kHz bandwidth and is consistent with the 96 kHz bandwidth of a 192 kHz digital sample rate. It can be argued that the region between 20 kHz and 100 kHz may offer little musical content, and even if it does, the only living thing in your house that could possibly hear it is the family dog or cat. The real asset is that we have preserved the entire 20 Hz to 20 kHz bandwidth after passing through four audio components in a typical playback system.
Nowadays, professional audio systems usually have analog signal chains that are much longer than 4 components. These operations place difficult requirements on the frequency response of each analog component in the chain. A chain of 16 analog components total, each with a bandwidth of 20 kHz, will produce an overall frequency response of about -48 dB at 20 kHz, 16 dB at 10 kHz and – 3 dB at 5 kHz. This really is telephone quality at best if you look at the curve on frequency graph! If the same system is built with 200 kHz components, the overall response will be – 3 dB at 50 kHz, about -1 dB at 20 kHz, and -.33 dB at 10 kHz.
All together, very high bandwidth is required of each component in the audio chain if we want to assemble a High-Resolution system that can handle sampling rates such as 192kHz. The proposed benefit of high resolution audio is not inaudible content, but better performance of digital systems within the 20 Hz – 20 kHz range. The idea of high resolution has now branched out to not only recording studio playback systems but consumer playback systems as well. Neil Young’s popular consumer playback system ‘PONO’ offers response all the way up to 250 kHz.
How does this all relate to recording and producing one of these lo-fi Chicago sounding record’s on a high-resolution system. Well if you think about it now after what was mentioned above, it’s going to be a better lo-fi sound. Not in the fact that it’s going to magically sound better because of the high resolution, but in the fact that it’s going to translate better across the consumer market because of the high resolution. What this means is for the first time, people are going to be able to hear the same sound at their home as what the artist heard when making the record in the studio. This is because from recording to mixing, mastering to final print and consumer playback, the full 20 Hz – 20 kHz spectrum will have been entirely preserved. This means the sound is accurate and unaffected from the process of making the record to hearing it. To all you audio engineers out there, take it into consideration, even if you’re recording lo-fi music such as hip hop and rap, especially hip hop and rap from Chicago.
So don’t be afraid to make those high-resolution records in 192kHz, that is, if your system can hack it. The consumer market is finally picking up the pace on affordable high resolution, or high definition playback systems. Really all we need now for high-resolution consumer audio to take hold is for a significant market progression away from the mp3 format. Lets keep our fingers crossed guys and girls!