Here at Studio 11, recording and producing the mixtape is what we do day in and day out. It’s an everyday occurrence, kind of like tea-bagging and the pudding dip, but that’s another story for another day. Over the last 17 years, we have recorded, mixed, and mastered close to 2000 different mixtapes for various rappers from Chicago and abroad. The writing is actually on our walls (come see for yourself). You’ll find that we have way more than a lot experience in the whole mixtape game. One thing that all this collective experience has taught us, it takes more than a well-produced mixtape to be heard. It takes a concerted effort from the artist, his or her manager, friends, family and even the fans. Here in this blog, we’ll discuss 5 detailed steps to producing, marketing, and promoting your mixtape so you can obtain the best and most impactful response out of its release.
Find The Right Studio
The first step on the journey of putting out a mixtape is finding a good studio in which to record your mixtape in. It’s important to find a studio that you are comfortable recording in, who understands your vision, and produces amazing sounding records. Always try and find out as much as you can when looking for a studio to record in. Who has worked in the studio before, what is the quality of the sound the studio produces, what is the speed of their workflow. Once you have found a studio you like and reserved the time you need, make sure that you come fully prepared. Write your rhymes at home to the music you are planning on recording to. Make sure all the lyrics you’ve written are memorized and well rehearsed before you arrive at the studio. Before you get to the studio, double check that you have all your beats with you in the best quality and format possible. It’s also important to have a back up plan just in case whatever device you brought your beats on such as a hard drive or cd doesn’t work.
Get A Good Mix and Master
After all the songs have been recorded, the next step in the mixtape journey is the process of mixing and mastering. To simply put it, mixing is defined as the process by which multiple sounds are combined into one or more channels. In the process, the source signals’ level, frequency content, dynamics, and panoramic position are manipulated and effects such as reverb may be added. This practical, aesthetic, or otherwise creative treatment is done in order to produce a mix that is more appealing to listeners. Always make sure your mixtape is cleaned up and mixed by a professional engineer who is experienced and knows what he or she is doing. Make sure that the sound is clear and crisp and that the sound levels are balanced throughout your mixtape.
Hire A Graphic Artist
When hiring a graphic artist to design your mixtape cover, make sure they understand your music and brand and that they can bring your ideas to life. Also be sure that they can bring forth their own creative cover ideas that will represent you and your mixtape effectively. So, with that being said, here are three tips to consider when hiring a graphic artist to design your mixtape:
–Versatility: When choosing a graphic artist, make sure that they are versatile, creative, and have a wide range of design skills. The main thing is you want someone who can convey your individuality and the themes and messages of your music, not someone who has a pre-designed approach to designing mixtape covers.
–Track Record: Request to see work they’ve done in the past. Additionally, when you’re hiring for services, such as PR, marketing, or website design, check track records too.
–Professionalism: We know that the hip-hop/rap industry can be a little casual, but business is business. Make sure you have a timeline for the design job and ask that the graphic artist is being consistent and communicating effectively with you throughout the design process.
Use Social Media to Promote Your Mixtape Release
–Engage: Follow other hip-hop artists, both established and up-and-coming, who have similar followers and fan bases. Additionally, follow DJs and other hip-hop influencers’, such as hip-hop editors, bloggers, etc. Keep track of who’s talking about you.
–Fan Promotion: Constantly engage with your fans and include them on your journey. For example, you can ask fans for opinions regarding the title of your mixtape, which track to promote, mixtape cover art, etc. Join their conversations; don’t just always flood them with links pertaining to your music.
–Plan: Plan an overall strategy so you do not get distracted from the main goal.
Find a DJ
When starting out, especially if it’s your first mixtape, don’t just look for DJ’s who are established to play your music. Go out and find Djs who are up-and-coming and who will truly believe in your music. The more Dj’s that have it, the more chances your mixtape will have to be heard. Power of the masses!
This list covers the overall basics. However, it is important to mention the viability of building your fan base prior to releasing your mixtape. Creating anticipation and hype prior to the release helps bring mystique and excitement to you as an artist and to the release as a whole. Don’t be cheeky, create that buzz!
All the best with your mixtape release!
In the world of music production, the definition of the phrase ‘music producer’ can mean many different things to many different people. Some producers are musicians, some are just engineers, some are actually remixer’s, while others are all three. So what is it exactly that a music producer does then?
In the simplest and most cohesive terms, the producer is actually the project manager to the process of composition, recording, mixing, and mastering. He or she is in charge of directing and maintaining the overall vision of the project, defines the sound and the goals of the project, brings an exclusive mindset to inspire, and assists with the provocation of the artist. A good producer will make the record more than the sum of its overall parts. In a way, you could almost say he or she is a scientist trying to create musical chemistry.
Each producer brings their own set of skills and approach to the project, so this can make summarizing what they do quite difficult. In this blog, I will define several recognizable types of producers so I can hopefully make this more clear for you, the reader.
The Audio Engineer
The profession of the audio engineer is what usually defines the average person’s stereotypical notion of the ‘classic’ music producer. This definition is aided by the visualization of the engineer perched over the mixing console, sweating over equalization and compression settings, effects combinations like chorus and reverb, track phasing, headroom, dynamics, so on and so forth. To many in the music industry, the studio is almost like an instrument, and it’s the music producer who plays it like a true virtuoso. For them, the project isn’t finished until the overall vision has been 100% realized. Whatever and however long it takes to get to the end goal of a sonic masterpiece, they will attempt it.
The Advisor / Mentor
There are many producers in the music industry who unlike the audio engineer, don’t have much technical expertise to speak of in the studio. They usually don’t sit at the mixing console during production of the records they make, but instead hire the best engineer who can help achieve the overall vision of the specific project in production. These advisor/mentor producers usually focus squarely on the artist’s vision, inspiration, and performance, helping them to produce the best sound and music the artist is capable of. One good example of this kind of producer is Rick Rubin, who seems to have a knack for positively inspiring and energizing the artists he works with.
The Midas Touch
There are some producers in the industry who almost seem to have a magical touch with whatever artist they work with, a kind of mysterious recipe that assures the best chances of success for the artist. Flood, with his trademark “wall of sound”, is one good example of this kind of producer whose career has dominated alternative, punk, and rock music for over 25 years. Dr. Dre, a more recent representation of ‘the midas touch’ producer, was almost entirely responsible for the vast output of some of the biggest names in R&B and Rap. It is important to keep in mind though that a distinctive sound is only a good thing if the style of the producer fits in with the artist.
The Remixer
A lot of people from today’s generation think the profession of ‘remix producer’ is a recent evolution in the music industry. However, the origins of the ‘remix producer’ actually began in the mid 70’s with the fusion of edits in the disco genre. These edits would be comped together to form what are known as ‘dub edits’ or ‘dub remixes.’ In the early 80’s, artist’s like Grandmaster Flash invented the sound of cutting and scratching. Shortly afterwards sampling and midi took remixing to a whole new level. Now, remixing has become such an essential part in the evolution and marketing of a song, that the remix often becomes the top ten hit before fans have heard the original version of the song remixed.
The Musician
Musicality, while one of the least recognized, is probably one of the most fundamental skills required of a producer. A good producer will add to, remark and counsel on the performance, songwriting, and arrangement of a song they are producing. Many producers are usually great musicians as well. It is also not uncommon to find them playing on the albums they produce.
The Artist
Some artists take their musicality to a whole other level by actually being the producer of the project. One famous example of the artist taking on the role of producer is Chicago’s very own hit maker, R Kelly. Not only has Kelly produced a continuous stream of hit records for his own brand name, he has produced hit after hit for virtually every major label artist in the dance, pop, r&b, and soul genres. Another great example of the artist/producer is Trent Reznor of Nine Inch Nails, who does everything from write to perform and engineer his own records.
As an audio engineer, the start of a recording/production project is usually one of the best parts of the project; the teamwork is all there, everyone involved is optimistic, and the overall focus of the big picture is challenging, invigorating, and most of all fun.
However, when it comes to the end of the project, it usually is one of the most taxing and least gratifying parts of the project. This is intensified by shifting focus to each individual involved in the project; all the endless detail and waffling of editing; the infinite possibilities of mix tweaks allowed by our computer systems; etc.
Strangely enough, that pivotal moment in the project where things change between collective ideology and individual artistic vision is usually during the time of rough mixing.
THE LOVE AND NEED OF ROUGH MIXES
In an ideal audio engineers world, daily rough mixes would be an essential step in moving a project forward. However, this isn’t always the case due to things like session time constraints, client financial issues, release dates, etc. Therefore, the limited number of rough mixes made during the project become even more important to the overall scope of the project. Each rough mix must represent a significant advancement in the overall vision of the project; inspire future creativity within the project; and help determine how much more time is needed before final mixing begins. Here are a few guidelines to think of when you are at the rough mix stage in your project.
The first rough mix of a project is sometimes referred to as the ‘raw mix’ or ‘organic rough.’ This is because it allows a unique opportunity to hear what the recorded tracks really sound like together with natural dynamics and unused space. When it comes time to begin the first rough mixes, keep in mind these mixes should be nothing but a representation of the initial recorded performance. This means that the first rough mix should only focus on the balance of all the recorded tracks together with very few edits, EQ, and processing. No overdubs either. The rough mix is actually raw and unproduced, but if recorded properly, still hi-fi. Allowing the imagination to open up, the rough mix helps the engineer, producer, and especially the artist contemplate what to do next in the song and how to fill any open space.
As the process of overdubbing begins, the next batch of rough mixes will understandably increase in complexity. It is this second round of rough mixes where you can and really should try things out. Take some f’n chances. You never know when you might discover something new and useful that will help take what you are working on to the next level. Experiment with different outboard combinations, try a new plug-in, create an over the top effect or two. And the good thing is, if it doesn’t work out, you can just get rid of it. Knowledge is power!
After all the experimental foray’s have been successfully/unsuccessfully attempted, it is time to do some rough mixes that one could say are dressed up rehearsals of what the final mix will become. Using the collective knowledge from all the experimentation as well as the overdubs and initial recording, I’d fashion together my most glorified mix of the project all while attempting to locate and resolve any problems from poor recording to bad performances, bad editing, etc. These mixes are then aided by having the artist or band go and listen to them on their own preferred sound system in hopes of providing meaningful feedback.
One thing to keep in mind, the rough mix process doesn’t always work out so well for every client. It’s always best when making that first rough mix to verify if the artist or band would like to hear it raw and organic or if they prefer it polished up a bit. Some current musicians and artists wouldn’t even think of listening to their part or song without at least some kind of tuning, quantizing, Eq-ing, or manipulation. They would likely find the organic rough mix to be faulty to a point of questioning the engineer’s proficiency and qualifications. They would never question their own. If some of your recording methods rely on drum replacement, comping and editing, virtual amplification then you might have to do a fair amount of work before presenting the first rough mix to your client.
In the second stage of rough mixing, where it’s good to experiment and create options, the liabilities can sometimes be quite overwhelming. Remember, even though experimenting and over effecting is fun for us because we’re engineers, to an artist who fears hokey exuberance and manipulation of their sound, it can be an all out declaration of war. Once again, it is always good to check with the artist or band member before experimenting or radically changing their sound, especially a vocalist. For some vocalist’s, having their voice washed in effects can really chap their ass, driving them to question your judgement, which in turn prevents you from making simple recording suggestions like ‘you should double this or stack that.’
By the time the third stage rough mixes are complete, they better be almost as good as what one would hear on the radio. Having a near perfect rough is just the beginning, it is now also all about ‘temp mastering’ (EQ, compression, expansion, limiting) on rough mixes so artists don’t throw a fit over low levels in comparison to final mastered albums.
So what exactly is the flip side to all of this? If the rough mixes are too good, they might get prematurely distributed. This is either because of an anxious artist posting their rough mixes on the web, unintended airplay or unintended leaks via insider moles. If people think a rough mix sounds finished, then it might get overexposed and diminish any chances of success the final mix could have.
As important and fun as rough mixing can be, the modern audio engineer should always make sure his or her approach and overall intentions are acceptable to everyone involved in the project. A rough mix is sometimes going to create disharmony and strong opinions amongst everyone involved in the project, but that dialogue and concession is exactly what is required to bring about the best in our art. As time passes and you begin to build a stronger reputation as an audio engineer through success, people will begin to hold more merit to your opinions and experimentation, which at the end of the day means your job as an engineer is just going to keep getting better, and better, and better, and better………
So, we’ve all done it at some point or another. Whether it be looking at the transients on waveforms to match tempos, watching the meters too much, or the biggest culprit – watching the graphic display on an EQ, we have all used our eyes way too much when mixing at some point or another…. How can one not with all those pretty graphics and curves.
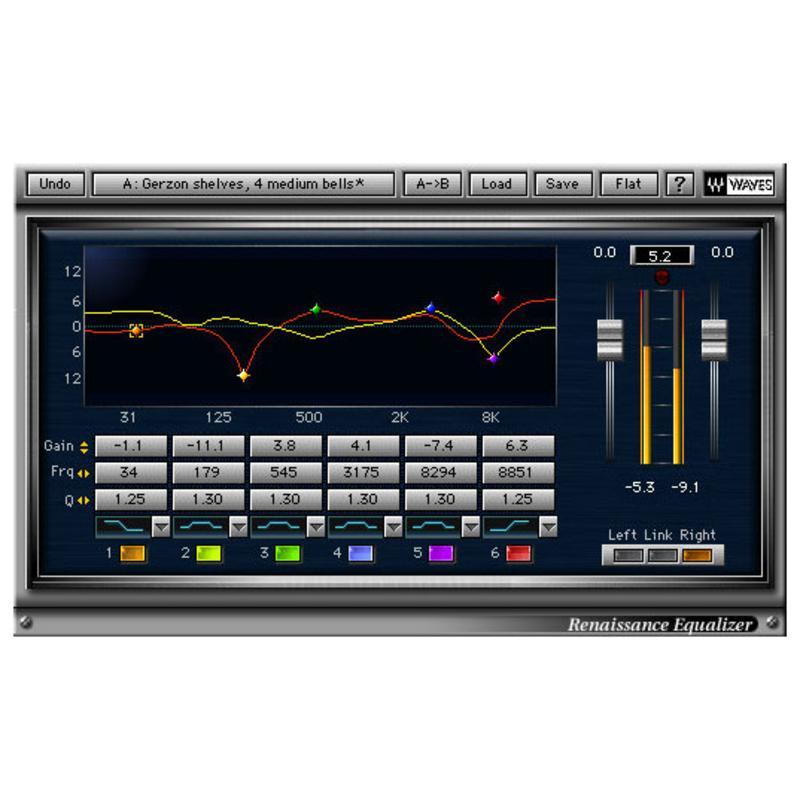
Waves Renaissance EQ 6 Parametric EQ
This little black EQ has been a big “go to” of mine for over 10 years now. I would have to say that close to 98% of the time I use this EQ during my mixes.
I’m not going to use this time to diss the Renaissance EQ, it just happens to be one of my main DAW EQ’s of choice. Its simple to use, I’ve always liked the sound and UI on this EQ, as well as the small amount of processing power it uses up. And I’ve always liked to see the results of what turning the knobs will bring. For some reason, I have always loosely correlated that the stranger the graphic display on an EQ looks after I use it, the better job I did at equalizing the sound. This probably stems from watching engineers mix ‘ITB’ back in the early days and noticing that the EQ curves on their graphic displays were always rather strange looking. My brain almost combines the two actions together (listening and looking at the curve)…. probably to my disservice. I found it’s really hard to not look at times. Even though I started my career on analog equipment, I’ve worked the majority of that career on a DAW, Pro Tools more specifically. I’m used to that workflow and have now come to find it familiar and home.
BUT……..
Recently, I was mixing a song for one of my regular clients and the mix just wasn’t coming out the way I hoped it would. The REQ6 has always helped me get that modern vocal sound for hip hop, rap, and trap music, but this project that I’ve been working on isn’t quite that. The approach needed was a more old school approach. The mix needed a warm, personal, underground kind of sound. That’s probably not the best way to describe it, but you get the idea.
To keep the story to the point, my traditional approach wasn’t working. So, I decided to go back to the drawing board. And what does that exactly mean in the world of digital audio engineering??
ZERO OUT THE FADERS AND REMOVE ALL PLUG INS!
So I decided to start the mix over completely from scratch. Over the last 16 years of engineering, I’ve learned that it’s ok to start over sometimes. Starting over allows you to put your head into a different space, try new things, not be so restricted, which is important when mixing a song. Usually when I make this decision, it is the right thing that is needed for the mix. So what was to be my new approach?
Since I decided I wanted to try and go for more of an old school approach to this mix, I needed to try and emulate the same workflow from that time period. So, just like a real analog console, I decided to use the SAME signal chain on every channel, since a real console has the same equalization and dynamics on every channel. My trusty old Waves SSL 4000 Channel Strip seemed like a good fit for this eclectic approach.
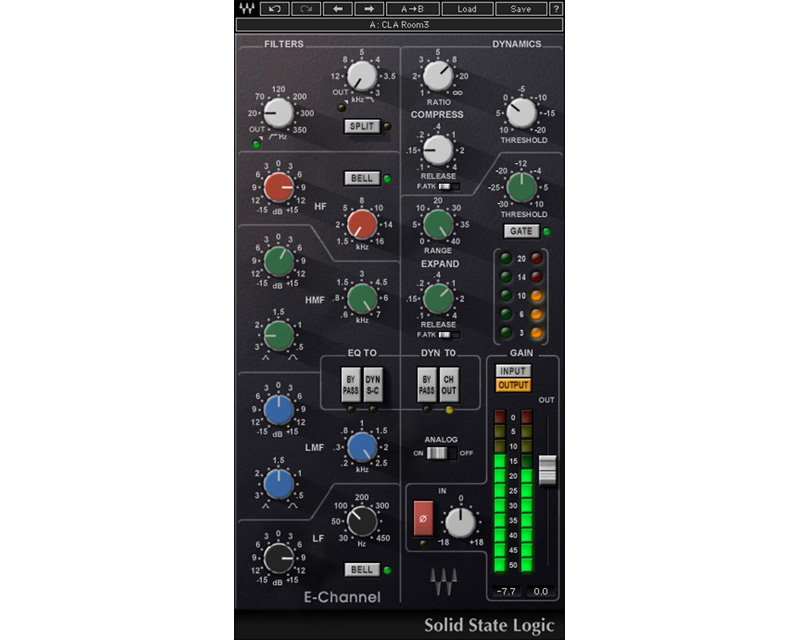
I started the mix over, and after a few hours, it started to sound the way I was hearing it in my head, smooth, fat, and personal. The mix was much warmer and less digital sounding than my first approach. Overall, it was more balanced and sounded pretty analog for a 100% digital ‘ITB’ mix. Because of this approach, I forced myself to really LISTEN, not listen through visual ques and folley. Now just because this approach worked this time around, doesn’t mean it will always work. Each song and genre is different, as well as their requirements for what makes a good mix. What I did learn from this though is that I had become lazy when using equalizers with graphic displays. At times, I found I was using my eyes to eq sounds, and since we can’t listen with our eyes, this was having the occasional adverse effect on my mixes.
So, if you are just starting out your career as a mix engineer, may I highly recommend not getting yourself stuck into the visual part of mixing if you are mixing ‘ITB’. There are times when it is important to see what you are doing, but it is what we hear that makes the overall sound of the mix.
In today’s market of music, it seems the file format of the MP3 has finally won out over the WAV file format. Music buyers can purchase their music digitally online and download it to their phone or music player within seconds. More and more popular music producers are rendering their instrumental beats and stems to mp3’s for use in studio sessions and licensing. Even the audio in the digital videos we watch on sites like Youtube and Netflix are streamed as an mp3. But why has this happened, who is to blame, and most importantly, why should we stop using the mp3 and resort back to wav.
To answer these questions, we must first understand the definition of what exactly an mp3 and wav file is, and what the differences are between them. So grab your nuts and pucker those cheeks, this is about to get more complicated than Keanu Reeves sexuality.
To understand what the definition of an mp3 and wav file exactly is, we will resort to the mighty all knowing Wikipedia. Thanks guys!
So according to Wikipedia…..
The MPEG-1 or MPEG-2 Audio Layer III, more commonly referred to as MP3, is an encoding format for digital audio which uses a form of lossy data compression. It is a common audio format for consumer audio streaming or storage, as well as a de facto standard of digital audio compression for the transfer and playback of music on most digital audio players.
The MP3 is an audio-specific format that was designed by the Moving Picture Experts Group (MPEG) as part of its MPEG-1 standard and later extended in MPEG-2 standard. The use in MP3 of a lossy compression algorithm is designed to greatly reduce the amount of data required to represent the audio recording and still sound like a faithful reproduction of the original uncompressed audio for most listeners. An MP3 file that is created using the setting of 128 kbit/s will result in a file that is about 1/11 the size of the CD file created from the original audio source. An MP3 file can also be constructed at higher or lower bit rates, with higher or lower resulting quality.
The compression works by reducing accuracy of certain parts of sound that are considered beyond the auditory resolution ability of most people. This method is commonly referred to as perceptual coding. It uses psychoacoustic models to discard or reduce precision of components less audible to human hearing and then records the remaining information in an efficient manner.
So like, wow! It pretty much means that the MP3 is an audio file format developed for people who are too auditorially stupid to hear that it sounds bad. And trust me, there are people out there who think MP3 sounds better, and some of them claim to be audio engineers. Oh no!
Now that we have that ingrained in our skulls, lets see what good ol’ Wikipedia has to say about WAV files.
Waveform Audio File Format (WAVE, or commonly known as WAV due to its filename extension) is a Microsoft and IBM audio file format standard for storing an audio bitstream on PCs. It is an application of the Resource Interchange File Format (RIFF) bitstream format method for storing data in ‘chunks’, and thus is also close to the 8SVX and the AIFF format used on Amiga and Macintosh computers, respectively. It is the main format used on Windows systems for raw and typically uncompressed audio. The usual bitsream encoding is the linear pulse-code modulation (LPCM) format.
Both WAVs and AIFFs are compatible with Windows, Macintosh, and Linux based operating systems. The format takes into account some difference of the Intel CPU such as little-endian byte order. The RIFF format acts as a ‘wrapper’ for various audio compression codecs.
Though a WAV file can hold compressed audio, the most common WAV format contains uncompressed audio in the linear pulse code modulation (LPCM) format. The standard audio file format for CDs, for example, is LPCM-encoded, containing two channels of 44,100 samples per second, 16 bits per sample. Since LPCM uses an uncompressed storage method which keeps all the samples of an audio track, professional users or audio experts may use the WAV format for maximum audio quality.
GET THAT! MAXIMUM AUDIO QUALITY!
So now that we have come to the understanding of what exactly an MP3 and WAV file are, let us return to the all important life seeking questions I proposed earlier in this diatribe.
So how did the MP3 format become the dominant format used in the music industry if it isn’t as good of quality as a WAV file? This question can be answered by pointing out that more people buy their music digitally now than physically. Physically meaning CD, Cassette, Vinyl. Since most online music retailers sell music only as MP3’s, people are then predominately purchasing only MP3’s as a result. A few retailers give the option of buying WAV files, but not many. (It should also be pointed out that Itunes sells music on their IStore in an AAC file format, which is another crappy audio file format unworthy of even the deaf.)
So now that the MP3 has taken over the retail music market, people have begun to think of it as a proper file format to use in the studio in their sessions because it’s the only format they know exists. Whether recording vocals to an MP3 instrumental, mixing music containing MP3 music stems, or printing final mixes as MP3’s, we see it here at Studio 11 more and more each day. What these people don’t understand is by using the MP3 format in the studio session, they are lessening the overall fidelity of their final music master.
The way to improve the fidelity is to use WAV files for your instrumentals, musical stems and final masters. If you are a vocalist who licenses or purchases instrumental music from a producer to record to, make sure you are only licensing or purchasing WAV files. Sure they may cost a little more than the MP3, but the quality of your final product coming out of the studio will dramatically increase. If you are a producer who makes his or her own beats, render your music stems down to 16 Bit 44.1kHz audio stems, or better yet 24 Bit 44.1khz stems. If you are an engineer or an aspiring engineer, always render your final stereo mixes down to a 16 or 24 Bit WAV file.
So who do we blame for this whole MP3 fiasco. I myself put blame squarely on the digital music retailers online for not selling a WAV file option or charging too much for the WAV file. Shame on you guys. Every retailer that sells music digitally should also include a standard WAV file option of 16 Bit 44.1kHz. If it’s a space issue on the retail servers, then they should just sell WAV files at a reduced price and drop the MP3 format altogether.
And we should also blame ourselves for purchasing music that is of inferior sound quality. I can not exclude myself from this category, as I am guilty of occasionally buying mp3’s for my music collection too when I am strapped for cash. However, I will declare from this point forward that I will only purchase wav files from now for my music collection. Music was made to be heard, and listening via a WAV file gives the listener the best chance to hear the music for what it is.