Cole: I always gave into the concept that if you recorded at higher sample rates then it sounds better. Some people I considered to be good engineers actually said if you can record 96khz then do it. If you don’t mind me asking how did you come to the conclusion of keeping the sample rate of your sessions at 44.1khz instead of using higher sample rates like 48, 88.2, 96khz? From what I know, you can’t record both at 48khz and 44.1 at the same time so it would be a bit difficult to a-b the two right?
Its kinda difficult to explain and also really depends on what kind of project you are working on. Certainly their are situations that warrant recording at a higher sample rate. But, 90%-95% of the time when recording, especially in genres where live instrumentation isn’t really used or needed, it is better to remain at a sample rate of 44.1khz. To help explain, first, i think it’s best to fully understand what digital audio really is.
So, essentially you have to think of digital audio as the summation of a lot of math equations, those equations coming from the process of converting an analog signal to a digital signal or what is commonly known as A/D. The architecture of those equations are determined by both sample rate and bit depth, which i’ll explain shortly. The final sum of those equations (which we call an audio file) is never quite a perfect answer, its always some kind of number with a lot of decimal points to it.
What makes the math imperfect is the fact that the sum is usually a number that is a rounded result from all the equations occurring in the process to convert an analog signal to a digital signal. The accuracy of the mathematics occurring is determined by the quality of the A/D process done by a device called the A/D converter, which you would also know as your Audio Interface. Depending on the actual quality of your A/D converter, the amount of decimal points that the sum will assume can either be short or an extremely large value. Top of the line A/D converters, the ones that cost as much $12 grand and higher, round out the sum of these math equations to a trillion or more decimal places, which means the sum is going to be a lot lot more accurate and detailed. Low end A/D’s round out these equations to a few hundred or thousand decimal places, so the sum is just not going to be as accurate and detailed.
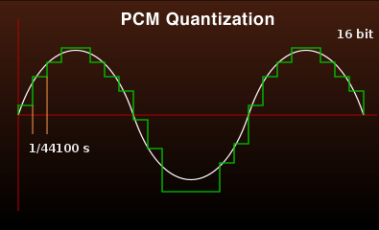
So what exactly is ‘the sample rate’? In a comparative ‘simple’ explanation, it essentially is a consecutive series of snap shots over a specific duration of time like a video or motion picture. But we’re not talking about video, we’re talking about audio. What defines the sample rate is how many of these snapshots of audio occur in the duration of 1 second as well as how consistent the interval between each snapshot is. So what 48 khz really means when you break that number down is that their is 48,000 snapshots of audio in 1 second. 44.1 khz means that their is 44,100 snap shots of audio in 1 second.
It’s also helpful to understand what ‘Bit Depth’ is as well in this conversation. Once again, to make a comparative ‘simple’ explanation, ‘Bit Depth’ represents how detailed each one of these snapshots are, kinda of like the amount of colors in a photograph. Black and white photos represent the lowest bit depth, and photos of many millions of color combinations represent the highest bit depths. Once again, since we’re not actually talking about photos, the details we are talking about in each snapshot of audio is decibel level steps in the frequency range of human hearing, which is between 20hz-18,00khz.
16 Bit audio has 65,536 steps while 24 Bit audio has 16,777,216 steps. Essentially, 24 Bit audio has 256 times the number of potential amplitude steps as 16 bit audio.
Now that we roughly know what digital audio, sample rate and bit depth are in terms of how they are defined, we can go back to your original question about why i mostly choose to record and work in a 44.1khz, 24 bit format as opposed to a higher sample rate and bit depth in our DAW.
You have to think of the A/D converter as essentially a sonic camera. You can kind of compare recording digital audio through different quality A/D converters to animating photographs from different kinds cameras. A really top end camera is going to take a high detailed snapshot, and obviously a cheaper consumer camera is going to take slightly less detailed snapshot. If you were to take 48000 snapshots in a row super quickly and animate those snapshots, its pretty clear that the animation of the snapshots from the top end camera is going to look way better than from the animation of the snapshots taken from the consumer camera. The same would apply if you were to take 44100 snapshots.
So now in the conversion process of converting audio from 48khz to 44.1khz, essentially we have to remove 3900 snapshots of audio to get from 48 kHz to 44.1 khz. But which snapshots are we going to remove? And when we remove those snapshots, what happens to all that extra space that was now created. The interval between each snapshot is not going to be consistent anymore. It would go something like, snapshot snapshot, missing snapshot, snapshot snapshot, missing snapshot instead of just snapshot after snapshot after snapshot. Because we had to remove those 3900 snapshots, if you were to animate the remaining 44100 snapshots back what you would see back is going to be less smooth and consistent. Totally not representative to what the animation of 48000 snapshots would look like because the intervals between snapshots wouldn’t be the same. So essentially converting audio down from 48khz to 44.1 means you are removing information from the 48khz file to make it a 44.1khz file. Anytime your removing information from an audio file like that, the end result is not going to be the same as the original audio file, even if its only the slightest of differences.
So thats why i keep everything at 44.1, so i’m not losing any tiny pieces of information from the audio file in the conversion process. Hope this is somewhat understandable.
Distortion, clicks, and pops can destroy an otherwise good recording session, and these problems 99% of the time are manufactured by something simple and easily avoidable. So here are a few quick things to check if you ever run into these situations.
Update Firmware, Software, and Drivers
The first thing that you must do is make sure your system has been completely updated. Lets say you just updated your OS to OSX Yosemite and you installed the drivers from the disc that came with your audio interface. You should always go to the website of the software you are installing and check for the most current software and drivers. With quick things move in the computer world, it is not always possible to possess the latest driver on the installation disc that comes with your software, even if you just purchased it.
It is also wise to make sure any audio applications, software synths, and plugins you own are up to date as well. Always go check the manufacturer’s website and update according to what they say in their instructions.
Buffer Settings
The next to check after you have updated your software would be your buffer settings. One of the simplest fixes for these types of problems can be changing your buffer settings. Understanding why you might possibly need to change the buffer setting can be a bit more difficult to understand and will be discussed separately.
Fixes
For the simplest answer: If you are getting distortion, pops or clicks in your recording raise the buffer setting in your audio application. In Logic, click on Preferences > Audio. On the Core Audio tab you will see “I/O Buffer Size.” Regardless of what the buffer size is set to, move it to the next highest number. For example, if your buffer size is currently set to 32, change it to 64. If it is set to 64, then move it up to 128, etc. In GarageBand, it is a bit easier: Click on GarageBand & Preferences. Click on the Audio/Midi icon and you will see the following screen:
Change to “Maximum number of simultaneous tracks/Large buffer size.”
Pretty much every other audio application will have very similar settings. If you are not sure where to these settings then contact the software manufacturer or look it up on Google or YouTube. If switching the buffer doesn’t fix the problem, the next step is taking a look at other USB or FireWire devices you may have plugged into your setup.
Other USB or Firewire Devices
Quite often other FireWire or USB devices connected to your computer can cause problems if your audio interface is FireWire or USB. Conflicts with other audio interfaces, cameras, etc can usually cause the biggest problems, but external hard drives can also cause problems as well.
Solution
If you are having problems with distortion, pops, and clicks and you have other devices connected to your computer, try the following:
1. Turn off your computer and unplug all USB and FireWire devices except for your main audio interface.
2. After you turn your computer back on, play something from iTunes and make sure the audio you are hearing sounds clear.
3. If you have an external USB or FireWire device, connect it to your computer and try running your session again.
4. If you are still having problems it might be time to bite the bullet and reach out to the manufacturer’s tech support.
It is best to keep all other devices disconnected from the computer while working on audio. The new Mac’s on the market are amazing and extremely powerful. If your desire is to record professional quality audio then you might not be able to connect every USB and FireWire device that you own because there is a limit to what you can do with your computer and DAW. If that is not your desire, connect all your devices back up and just keep doing what you are doing.
The understanding of recording, mixing, and mastering hip hop, rap, and other kinds of music is no doubt a talent and an art form. Development of this skill takes time, and requires many mistakes, experiments and life lessons. To truly benefit and prosper in audio engineering, one has to have a hunger to go through and take in the vast amount knowledge out there on recording, mixing, and mastering.
Once you begin sifting through the knowledge and applying it in a real world setting, you will come to find there is a big difference between knowing something and actually getting it. The beautiful thing is, once you finally get something, the ability to master those techniques and others becomes exponentially easier. You will find that recording, mixing, and mastering isn’t really a job anymore, it is just a part of life.
Over the last 16 years, I have had to learn many hard lessons in the world of audio engineering. A lot of times I thought I understood what certain techniques were and how to apply them, but I often was wrong or just partially correct on those techniques. Some of my most memorable times in the studio were when I finally ‘got’ a certain recording or mixing technique. You can say these were my ‘a-ha’ moments.
1. Learning everything there is to possibly know about the hardware and tools I have at my convenience.
2. Compression: Much can be discussed about this subject, but one thing that is so crucially important is getting the attack and release times correct. Compression can really lift up a performance or it can shamefully destroy it.
3. The day I realized that pretty much anything in the studio could be automated in some form or another.
4. Low and High Pass filtering is truly my friend.
5. The first time I turned off my computer screen to listen back to a mix. Blew me away how much easier it was to listen, identify, and make changes to the mix.
6. The first time I recorded and mixed in a professional acoustically treated studio. The amount of detail and separation I could hear in the frequency spectrum almost startled me.
7. How simply cutting out a little 275-375 Hz on most close mic’d tracks can remove boxiness and really bring out detail to things.
8. Getting rid of frequencies, or subtractive equalization, is so much better than additive equalization. Its just easier and more natural to take out what isn’t needed than to artificially add it in.
9. Hearing live drums mic’d through a stereo pair of C12’s and PZM’s. I finally understood where the life and dimension of a recorded drum performance came from.
10. Discovering that the more plugins I use in a mix, the more digital and artificial sounding the mix will become.
11. Distortion is a form of compression and a good way to add harmonics.
12. The first time I threw up a quick mix of raw audio tracks instead of attempting to dial in the perfect sound on every track. It increased the overall quality of the mix while cutting down average mix time.
13. It’s always good to get feedback, even if its from somebody without any musical or audio engineering experience.
14. Getting stuck in a mix, zeroing the faders, trashing all inserts and sends and then pushing the faders back up again. Valuable learning experience and test to the ego.
15. Dynamic Equalization via side chain compression. The bees knees!
16. Realizing that knowing how you want things to sound in your mix is so much more important than just knowing cool mix techniques and tricks. The tricks can sometimes help you get there a little faster though.
17. Musical arrangement is vitally important to the outcome of a mix on a song. It’s where the song can really be made or destroyed.
18. “Fix it in the mix” is a term that doesn’t always apply to every situation. Sometimes it is faster and easier to just re-record something if it is not right.
19. Parallel compression allows for smoother, natural dynamics overall and less aggressive compression individually.
20. When, after what seemed like centuries of recording amateur artists and bands, somebody of superstar status steps up in front of the microphone and shows how it’s really done. Wow!