When you step into a room, the last thing on your mind might be its acoustic properties. Yet, the way sound interacts with the room’s size, shape, and features can profoundly impact our experience. From the charming echo in a cathedral to the stifling echo in a bare apartment, acoustics play a significant role in our everyday lives. By diving into the fascinating science of sound—its wave properties, interaction with different surfaces, and behavior in diverse spaces— we can begin to understand and address room acoustic issues. Equipped with the knowledge and tools to identify problems such as echos, resonances, and dead spots, we can transform aural spaces to optimize sound quality.
Understanding Basic Acoustics
Unraveling the Fundamental Principles of Sound and Acoustics
Acoustics is a branch of physics that delves into the study of sound – its production, transmission and reception. This intriguing multidimensional field has remarkable potential implications in music, speech, medical diagnostics and the design of buildings. To truly appreciate the eclectic scope of acoustics, it is imperative to grasp some basic principles that govern sound and its behavior.
To begin with, sound is essentially a mechanical wave that results from the movement and interaction of particles within a medium. It is the molecular vibrations propagating through mediums such as air, water or solids that we perceive as sound. The fundamental types of sound waves include longitudinal waves, presented as compressional or rarefactional waves, and transverse waves that oscillate perpendicular to the direction of the wave.
Another cardinal concept is the speed of sound, or sonic speed. It varies based on medium and temperature, on average approximating 343 meters per second in air at room temperature. The temperature dependency of the sound’s speed alludes to the direct proportion between them. It is further noteworthy that sound travels faster in solids compared to liquids, in turn, quicker than in gases due to closer particle spacing.
Frequency and wavelength are crucial to understanding the nuances of sound waves. Frequency, measured in Hertz (Hz), equates to the number of wave cycles occurring per second. Humans can discern a frequency range from 20 Hz to 20,000 Hz, with frequencies greater than 20,000 Hz deemed as ultrasound. On the other hand, the wavelength is the spatial period of the wave, inversely related to frequency.
When discussing sound, the aspect of intensity and loudness warrants attention. Sound intensity is an objective measure defined as the sound power per unit area. On the other hand, loudness is a subjective perception, varying across individuals and frequencies.
The principle of resonance in acoustics refers to the phenomenon of a vibrating system responses to an external force at its natural frequency. It yields amplified effects and is a fundamental concept in musical acoustics, affecting the design of musical instruments.
Sound also exhibits the property of interference, where two or more coherent sound waves superpose to give a resultant wave of greater, lower, or the same amplitude. These culminate in constructive and destructive interferences.
Auditory sensation deserves mention as it impacts the design of auditoria for optimal acoustic propagation and reducing unwanted echoes. The Sabine’s formula is widely used when designing spaces for specific acoustic behaviour.
Lastly, let’s turn our attention to the Doppler Effect. It explains the observed change in frequency and wavelength of a wave due to relative motion between the observer and the source.
In conclusion, these fundamental principles offer a rudimentary ingress into understanding acoustics’ complex realm. The intricate science of acoustics is under continuous scrutiny and development, with advances heralding breakthroughs that enhance our understanding of the world and beyond.
Identifying Sound Reflection and Absorption Problems
A Distinct Investigation into Sound Reflection and Absorption
Understanding the phenomena of sound reflection and absorption is paramount in a multitude of scientific and practical applications. Discerning the nature of these two acoustic kinematics draws upon a deep comprehension of wave propagation in materials and how they interact with the environments in which they are found.
Sound reflection, oftentimes referred to as echo, is a result of sound waves bouncing off surfaces and returning to the source. Hard, flat, and dense surfaces, such as a high concrete wall, are generally excellent reflectors of sound. Such surfaces often decrease the energy loss during the reflection process significantly, causing an echo that can be discerned clearly. Conversely, curved or angled surfaces can lead to a diffusion of sound waves, mitigating the magnitude of direct reflections.
However, it is this echo or sound reflection that sets the stage for acoustic problems, primarily for acousticians and architects. Excessive reflective sound can cause echo feedback and may result in poor auditory experiences, commonly known as reverberation. It can induce strain on sound designers and pose considerable difficulties in spaces intended for optimal sound delivery, such as concert halls and theaters.
Investigating the problem instigated by the phenomenon of sound absorption is an equally vital aspect of acoustics. Sound absorption is germane to the energy transformation process when a sound wave interacts with the material of a surface. Here, a part or all of the sound’s energy is converted into heat or mechanical vibrations, rendering the sound less audible or in extreme circumstances, entirely inaudible. Such an occurrence primarily happens if the surface material is soft and porous, like carpet or foam.
Lack of proper sound absorption can lead to sound reflection and cause excessive noise levels. In certain environments where acoustics play a crucial role, such as recording studios, classrooms, and offices, uncontrolled sound absorption can derogate the effectiveness of communication, disturb serenity and dampen productivity.
To rectify these sound problems, a keen understanding of room acoustics is indispensable. Sound reflection can be managed appropriately by utilizing diffusers, which scatter sound waves, reducing the strength of direct reflections. It helps in maintaining a balance between absorbed and reflected sound within a space.
Controlling sound absorption is generally managed through the strategic use of absorptive materials that aim to capture and convert sound energy, diminishing sound reverberation. This step can significantly improve a room’s acoustic clarity, irrespective of whether it is a large hall or a small room.
In the profound exploration of acoustics, sound reflection and absorption stand as two sides of the same coin. An in-depth recognition of these issues sets the platform for creating acoustically efficient spaces. It further enhances the quest for meliorating auditory experiences across environments, rendering the exploration of the myriad intricacies offered by sound, a feat in itself.
Solutions for Sound Reflection and Absorption Issues
Prior to delving into the solutions for sound reflection and absorption issues, it is imperative to comprehend their effects and significance.
Addressing sound reflection and absorption ensures optimal acoustic clarity and overall sound quality, which is integral for maintaining the auditory satisfaction in a designated space, be it a concert hall or an office room.
To curb the issue of sound reflection, one would need to understand its mechanics. Undulated surfaces, as opposed to flat ones, scatter incoming sound waves in different directions mitigating the occurrence of echoes.
Therefore, the purposeful utilization of diffusers, which are devices designed to scatter sound waves, is a viable solution to reduce direct reflections. Mainly used in spaces like recording studios and concert halls, these diffusers help to maintain the natural ambient sound by ensuring that the reflected sound waves reach the listener from various directions.
Other solutions lie in adjusting the interior architecture of a room. Angled walls, ceilings, and strategically positioning structures, such as bookshelves, can contribute significantly to diminishing sound reflection. Also, remember that sound is a tamed beast that can be redirected and reshaped to suit the specific acoustic needs of your space.
Shifting focus to sound absorption, it’s essential to educate oneself about its importance. In short, an effective sound absorption strategy can transform a cacophonous environment into a harmonious one. As already noted, soft and porous materials are among the most effective absorbers of sound – a principle that forms the basis of acoustic insulation in interior design.
Materials like foam rubber, mineral wool, and even specific types of wood can be strategically placed to absorb excess sound thereby reducing noise levels. Sound absorbing panels, composed of these materials, placed at key reflection points prevent the bounce-back of sound waves that lead to echoes and reverb, hence promoting the desired level of ‘quietness.’
Managing reverberation is another critical part of addressing sound absorption. When there is an excessive prolongation of sound due to repeated reflections off the surfaces, it results in a reverberant field. For a controlled reverberation time, the use of high absorption coefficients materials proves beneficial.
Last but not least, the advent of software solutions cannot be overlooked. Digital models of the room could be used to identify troublesome points and tailor the most effective solutions.
In conclusion, an understanding of sound reflection and absorption, along with intelligently designed spaces, allows the luminous world of acoustics to be at your command. It takes a blend of science, engineering, and a dash of creativity to fine-tune your room’s acoustics, creating an environment conducive for conversations, enjoying music or achieving peace and tranquility.
Acoustically considering, the perfect room is achievable. Through a mixture of thoroughly studying sound wave behaviors, correctly identifying reflection and absorption problems, and implementing effective solutions such as sound diffusers and bass traps, we can dramatically improve room acoustics. By fine tuning room characteristics- its shape, materials, furniture placement- we can optimize the sound quality. Indeed, acoustics is not only about the realm of experts or concert hall designers. By applying these principles in our homes and offices, we can enhance our everyday sonic experiences, from enjoying music to a quiet conversation, echoing the true harmonies of life.
The history of synthetic reverberation devices is closely tied to the evolution of audio technology and the quest for creating artificial reverb effects. Here is a brief overview of the key developments in the history of synthetic reverb devices:
Echo Chambers (1940s):
The earliest attempts to create synthetic reverb involved using physical spaces, such as echo chambers. These were essentially dedicated rooms with speakers and microphones that were used to create reverb effects by playing sound and capturing the reflections. Famous examples include the RCA Echo Chamber at the RCA Victor Studios in New York City.
Plate Reverbs (1950s):
Plate reverb units emerged in the 1950s as a significant breakthrough in synthetic reverb technology. These devices utilized large, vibrating metal plates to generate reverb effects. The EMT 140 Plate Reverb is a well-known example and is celebrated for its warm and distinctive sound.
Spring Reverbs (1960s):
Spring reverb units, like the AKG BX 20, became popular in the 1960s. They used a system of springs to create reverb by bouncing audio signals back and forth, producing a unique and sometimes characteristically “twangy” sound.
Digital Reverbs (late 1970s and 1980s):
The late 1970s saw the advent of digital reverb devices. The most significant of these was the EMT 250 Electronic Reverberator, which is often considered one of the first true digital reverb units. It employed digital signal processing to create reverb algorithms and was a milestone in the history of synthetic reverb.
Early Digital Processors (1980s):
The 1980s witnessed the rise of dedicated digital reverb processors, like the Lexicon 224 and Eventide SP2016. These units offered a range of algorithms and controls for tailoring reverb effects to specific needs.
Advancements in the 1990s and Beyond:
In the 1990s and beyond, digital technology continued to advance, leading to the development of more sophisticated and versatile reverb processors. Companies like TC Electronic, Yamaha, and Lexicon introduced a range of digital reverb units that provided greater control and better emulation of natural acoustic spaces.
Modern Software and Plugins:
With the advent of powerful digital audio workstations (DAWs), the use of software reverbs and plugins became prevalent. These software-based reverbs allow for an even wider variety of reverb effects and the emulation of classic hardware units.
Today, synthetic reverb devices come in various forms, from high-end hardware units to affordable guitar pedals and versatile software plugins. They offer a wide range of reverb types, from natural room and hall reverbs to more experimental and creative effects, catering to the diverse needs of musicians, producers, and audio engineers.
SYNTHETIC REVERB IN EARLY USE
The early use of synthetic reverb in recordings had a profound impact on the music industry and audio production. Musicians and producers began to explore the creative possibilities of artificial reverb, and it became an essential element in shaping the sound of popular music. Here are some examples of early recordings that prominently featured synthetic reverb:
Elvis Presley – “Heartbreak Hotel” (1956):
Elvis Presley’s “Heartbreak Hotel” is often considered one of the first rock ‘n’ roll recordings to make extensive use of artificial reverb. The song’s vocals and guitar were recorded with heavy plate reverb, giving it a distinctive and haunting sound.
The Beach Boys – “Good Vibrations” (1966):
The Beach Boys’ “Good Vibrations” is a prime example of innovative studio techniques. It featured an electro-theremin-like instrument called the Electro-Theremin, and its distinctive reverb-drenched sound was achieved using a combination of plate reverb, echo chambers, and other effects.
The Beatles – “Tomorrow Never Knows” (1966):
The Beatles were pioneers in exploring studio techniques, and “Tomorrow Never Knows” is a notable example. John Lennon’s vocals on the track were heavily treated with artificial reverb and other effects, creating a psychedelic and otherworldly atmosphere.
Pink Floyd – “Set the Controls for the Heart of the Sun” (1968):
Pink Floyd’s early work, particularly the album “A Saucerful of Secrets,” showcased their experimentation with synthetic reverb. “Set the Controls for the Heart of the Sun” features prominent reverb effects that contribute to the song’s spacey and hypnotic quality.
Led Zeppelin – “When the Levee Breaks” (1971):
Led Zeppelin’s “When the Levee Breaks” is known for its iconic drum sound, which was heavily treated with reverb. The band recorded the drums in a stairwell and then added further reverb in post-production, resulting in a massive and thunderous sound.
David Bowie – “Heroes” (1977):
Brian Eno, the producer of David Bowie’s “Heroes,” was known for his innovative use of synthetic reverb and other studio effects. The album’s title track, “Heroes,” features Eno’s distinct treatment of the vocals, giving them a sense of grandeur and space.
Kraftwerk – “Autobahn” (1974):
Kraftwerk’s pioneering electronic music often made use of reverb effects to create a futuristic and immersive sonic landscape. “Autobahn,” the title track of their album, uses synthetic reverb to enhance the sense of movement and space.
These early recordings highlight the creative ways in which artists and producers embraced synthetic reverb to shape the sonic landscapes of their music. As technology continued to advance, the use of reverb and other studio effects became even more sophisticated and integral to the recording process.
DEFINING THE CHARACTERISTICS BETWEEN TYPES OF SYNTHETIC REVERB
The tone and character of synthetic reverb can vary significantly depending on the type of reverb algorithm or hardware used. Here, I’ll describe the differences in tone between various types of synthetic reverb:
Plate Reverb:
Tone: Plate reverbs are known for their warm and smooth sound. They tend to add a sense of richness to the audio, and they can be especially effective for vocals and instruments.
Characteristics: Plate reverb has a distinct character, often described as “vintage” or “classic.” It imparts a pleasing coloration to the sound, with a relatively short decay time compared to other reverb types.
Spring Reverb:
Tone: Spring reverbs have a unique, twangy character. They are often associated with vintage guitar amplifiers and can add a surf-rock or retro vibe to a sound.
Characteristics: Spring reverb is characterized by its boingy, metallic quality. It tends to be less smooth and more characterful than plate or hall reverbs.
Room Reverb:
Tone: Room reverbs aim to replicate the sound of various room sizes, from small to large. They offer a more natural, intimate, and authentic sound, making them suitable for a wide range of musical genres.
Characteristics: The tone of room reverbs depends on the size and characteristics of the simulated room. Small room reverbs provide a sense of closeness and intimacy, while larger rooms can create a sense of space and depth.
Hall Reverb:
Tone: Hall reverbs aim to emulate the sound of concert halls and larger performance spaces. They tend to have a grand and spacious character, making them ideal for adding a sense of depth and grandeur.
Characteristics: Hall reverbs are known for their longer decay times and rich, lush sound. They can add a sense of elegance and majesty to audio recordings.
Chamber Reverb:
Tone: Chamber reverbs replicate the acoustics of specific rooms or chambers. They can have a character that falls between room and hall reverb, offering a balance of intimacy and space.
Characteristics: Chamber reverb can have a distinct character, with varying tonal qualities based on the specific chamber being emulated. It can provide a unique and characterful reverb sound.
Digital Reverb:
Tone: Digital reverbs can have a wide range of tones, depending on the algorithms and settings used. They are known for their clarity and precision, making them versatile for various applications.
Characteristics: Digital reverb offers more control over parameters like decay time, pre-delay, and modulation, allowing for a wide variety of tones. Some digital reverbs aim for pristine realism, while others can produce creative and experimental effects.
Convolution Reverb:
Tone: Convolution reverbs are known for their ability to capture the sound of real-world spaces accurately. The tone can vary depending on the specific impulse response used for convolution.
Characteristics: Convolution reverb provides a high degree of realism, allowing you to place audio in virtual recreations of actual locations, such as famous concert halls or cathedrals.
The choice of reverb type and settings depends on the desired sonic outcome, the genre of music, and the creative intentions of the producer or musician. Each type of reverb offers its unique tonal characteristics, and experimentation with different reverb types is often a crucial part of the creative process in audio production.
PARAMETERS AND SETTINGS FOR REVERBERATION DEVICES
Different types of reverberation devices, including plate reverb, spring reverb, digital reverb, convolution reverb, and algorithmic reverb, offer various parameters and settings to control the reverb effect. Here’s a list of common parameters and settings you might find for each type:
Plate Reverb:
Decay Time: Adjusts the length of time it takes for the reverb to decay.
Damping: Controls the high-frequency attenuation of the reverb tail.
Pre-Delay: Introduces a delay between the dry sound and the onset of the reverb.
Input Level: Sets the input gain into the plate reverb unit.
Output Level: Controls the output level of the reverb effect.
Tone Control: Adjusts the overall tonal balance of the reverb.
Spring Reverb:
Dwell: Controls the input signal level or dwell time, affecting the intensity of the reverb.
Tone Control: Adjusts the tone or frequency response of the spring reverb.
Mix: Regulates the balance between the dry and wet signal.
Number of Springs: Allows you to select the number of springs used in the reverb tank, affecting the character of the reverb.
Digital Reverb:
Decay Time: Alters the length of the reverb tail.
Pre-Delay: Introduces a delay before the onset of reverb.
Diffusion: Controls the density and spread of the reverb reflections.
Modulation: Adds modulation to the reverb reflections, creating a sense of movement.
Low and High EQ: Adjusts the frequency balance of the reverb.
Room Size: Simulates different room sizes or reverb spaces.
Early Reflections: Controls the level and timing of early reflections in the reverb.
Convolution Reverb:
Impulse Response Selection: Allows you to load and choose from a library of impulse responses for various real-world spaces.
Mix: Adjusts the balance between the dry and wet signal.
Pre-Delay: Introduces a delay before the onset of reverb.
EQ: Enables you to apply equalization to the reverb.
Size: Alters the perceived size of the space based on the convolution.
Algorithmic Reverb:
Room Type/Algorithm Selection: Choose from a range of algorithm presets (e.g., room, hall, chamber).
Decay Time: Adjust the length of the reverb tail.
Pre-Delay: Introduces a delay before the onset of reverb.
Diffusion: Controls the density and spread of the reverb reflections.
Modulation: Adds modulation or movement to the reverb.
High and Low EQ: Tonal shaping of the reverb effect.
Early Reflections: Control the level and timing of early reflections in the reverb.
Size/Room Dimensions: Adjust the virtual room size or dimensions.
These parameters and settings are common in various reverb devices, but the specific terminology and implementation may vary from one unit to another. When working with reverb, understanding these parameters is crucial for tailoring the reverb effect to suit your creative and sonic goals.
LEGENDARY REVERBERATION DEVICES
Lexicon 480L: The Lexicon 480L is an iconic hardware reverb unit known for its high-quality, lush reverb algorithms. It was widely used in the music and post-production industry.
Eventide SP2016: Eventide’s SP2016 was a groundbreaking reverb processor in the 1980s, featuring various reverb algorithms and was popular in studios.
EMT 140 Plate Reverb: The EMT 140 is a classic plate reverb known for its warm and smooth reverb tails. It was used extensively in the 1950s and 1960s.
AKG BX 20: The AKG BX 20 is a legendary spring reverb unit that was prized for its unique character and has been used on countless classic recordings.
Bricasti M7: The Bricasti M7 is a modern digital reverb unit known for its pristine sound quality and versatile algorithm options.
Strymon BigSky: The Strymon BigSky is a popular digital reverb pedal for guitarists, offering a wide range of high-quality reverb sounds in a compact format.
TC Electronic TC 6000: The TC Electronic TC 6000 is a high-end hardware reverb processor used in professional studios for its flexibility and sound quality.
AMS RMX16: The AMS RMX16 is a classic digital reverb unit that gained popularity in the 1980s and is known for its distinctive sound.
EMT 250 Electronic Reverberator: The EMT 250 was one of the first digital reverbs and is considered a milestone in reverb technology.
Neve RMX16: Neve’s RMX16 was another classic digital reverb processor, featuring multiple reverb programs and lush, distinctive reverbs.
Lexicon 224: The iconic predecessor of the 300 and 480L reverbs.
These are just a few of the most iconic and influential reverberation devices in the history of audio production. Keep in mind that technology has evolved, and there are many modern software and hardware reverbs that offer outstanding quality and versatility as well.
So about 2 days ago, I had an intriguing conversation with a rapper at an open mic show here in Chicago. After he found out that i was a professional audio engineer who worked out of Studio 11, he claimed he didn’t need to go to a recording studio to work on his music since he had one at home. He disputed the fact that professional music studios aren’t needed anymore due to the fact that the quality equipment needed to record, mix and master has become not only inexpensive, but easy to use. So lets outline this debate. Do musicians still need the services of professional recording studios? Most of the salesmen and women at Sweetwater Sound or Guitar Center would love for you to think that if you purchase a certain DAW system, microphone, audio interface and descent pre-amp, that you can in fact produce a professional, ready for radio sounding recording. In all reality, it is in fact technically possible, so this rapper’s claims when we spoke aren’t that far off base. However, the real question is, is it possible for you to do so? When i listened to one of his songs that he recorded and produced at home, the quality was terrible compared to the quality that myself and the rest of our staff aspire to here at Studio 11. The art of audio engineering is a skill just like playing the drums, piano or training to sing. To be frank, it probably takes much much longer to become savvy with all the aspects and techniques that are involved in audio engineering than learning an instrument. 99.9% of all audio engineers aren’t very good when they first start out in the profession. Many start learning the craft by going to a school, interning at one or several recording studios, and shadowing other skilled audio engineers in the field. When it comes to myself, i interned at 3 different studios after my first year at college. After leaving college during the middle of my sophomore year, this internship i had eventually led to an assistant job, where i met and shadowed many different highly skilled audio engineers and producers. I was literally at the studio 7 days a week, 12-14 hours a day learning everything i could from them. You could really call these people my mentors. 24 years later, i am still friends with some of the engineers and producers i assisted for. And i still ask them questions from time to time, however, they also ask me questions from time to time now too. Overall, it can take aspiring engineers anywhere from 5-10 years or longer to acquire the skill set that will allow them to swim in the same waters as other highly skilled engineers when it comes to proficiency and client satisfaction. A lot of aspiring engineers never become good at the profession. I would say it took me about 6 years to understand and utilize the skills i learned to become proficient enough to produce high level recordings for clients. When it comes to musicians, they are used to purchasing music equipment to sound better. Purchase a nicer guitar, it sounds better. Purchase a nice amp, its gonna sound better than a cheaper amp. So to these musicians, that mindset should translate to when they purchase a good microphone and recording equipment. Their recordings are gonna sound better since they have nice gear. But is that really gonna be the case? NOT REALLY When it comes down to it, you could purchase the best gear available and still sound like ass. What a lot of musicians seem to forget is that when you’re purchasing gear, you’re just purchasing the gear. The gear you purchase is just one link on the chain. Its as if a kid who never made a beat before spent 20k on a system to make beats. Then Timbaland comes in with a $100 casio drum machine. Who do you think is gonna make a better beat? The quality of the system used to make the beat doesn’t make the kid magically better, its the skills learned over time that do so. Shortly after most people purchase recording equipment to establish a home studio, they begin to find that the recordings they are producing don’t stand up to the recordings they listen to on a daily basis from their favorite bands and recording artists. So what do these dotards do? They go out and purchase even more expensive recording equipment and systems. Its as if they say to themselves, “Well, I just need a better microphone, preamp, audio interface, speakers, plugins, etc, then I’ll get it right”. IT'S THE EAR NOT THE GEAR!! The truth is, what these home studio cowboys need to understand is that they have to learn how to record and mix their audio properly through what they already own. When it comes to proper engineering, any good engineer that does their work from a DAW can produce a great mix with only the stock plug ins that come with the software. The idea would be slightly different with engineers that only work on analog systems. But, because the principles of recording and mixing are pretty much the same for both the analog and digital world, engineers that prefer using all analog systems would still be able to produce a great sounding mix on a DAW. The only hindrance would be the engineers lack of knowledge in how to use the software. It wasn’t that long ago when recording anything would require a large amount of money to do so. To start a recording studio, you’d have to spend at least 100K on all the gear. This doesn’t include the money required for the space the studio would occupy, nor does it include the money needed to develop the correct acoustics while building the studio. Proper acoustics mean everything when it comes to producing professional recordings and mixes. Here in 2022, really all you need to start recording your music is a descent laptop, microphone, interface and studio monitors. The bar to get in on the ground floor of recording is considerably lower than what it used to be back when i was younger. In all honesty, most musicians can learn pretty quickly how to make decent demo recordings at home on any average DAW. But keep in mind, the keyword to that last sentence was demo, not professional. Its like i tell clients of mine, use your home studio to record, practice and perfect your ideas. This way, when you come into our studio to record and bring these ideas to life, you’ll know exactly whats gonna sound good while doing so. Truthfully, i make most of my clients rerecord their material here at the studio when they bring me projects to mix that they recorded at home. Not only do we have significantly better gear here at the studio that we use when we record, but the experience myself and the rest of our staff have in producing a great sounding recording is light years ahead of the experience our clients have. The end result always produces a much better mix. Sometimes it can be a challenge convincing them to rerecord their material, but once we convince them there is no turning back. GETTING PLAYED Its pretty typical for musicians to react emotionally. To them, if they like the music they are making then other people should like it too. But the real question is, will these other people ever get a chance to hear it. Will they purchase it? Will they listen to it while in their car, on their earbuds, or in the club. Just because your home produced song sounds good to you doesn’t mean it will sound good to other people on whatever medium they listen to music through. A song that is mixed poorly doesn’t translate well to other formats and systems. Ever since radio began, it was used as a medium to get music to a mass audience. Over time, this eventually led to a standard on how each of the different genres of music should sound. If a song doesn’t fit into the acoustical standards of other comparable music in the same genre, then the chances are pretty small that it will be considered for a radio playlist. That not only includes AM/FM radio, but streaming services such as Spotify, Soundcloud, etc. Even club DJ’s depend on the music they are playing to sound as good as possible. They want their set to have the most impact they can get with the patrons on their dance floor. Once again, if the sound quality of the song is lacking, then the chances are slim that DJ’s would play it or give it any attention. Releasing a poorly mixed song doesn’t necessarily mean that people won’t hear it, but it can affect whether people will like it or even remember it. A normal listener either likes a song or doesn’t. Usually these people won’t be able to tell you why they like it or not. However, if your song lacks transparency or punch, if key elements that drive the song can’t be heard clearly, if the vocals are not in tune with the music, or the song is too quiet compared to the playback of other songs, then any or all of these issues can turn someone off to your song. The convenience of having a professional engineer and producer work on your music is that he or she can offer you direction, help you deliver a better performance while recording as well as make suggestions to improve your songs to make them more marketable. Most artists on major record labels work in the recording studio with a professional engineer and or a producer. The studio may not always provide the engineer or producer, regardless one or both of these kinds of people will usually be present during the project. Since many musicians and recording artists record their music at home, that not only means that they are wearing the hat of the recording artist, but they are also wearing the engineer and producer hat as well. But what they always forget is that in the music marketplace, they are competing against songs that are professionally engineered and produced. And these producers really understand the trends in the marketability of each genre. ENVIRONMENT High quality recording and mixing equipment isn’t the only thing that makes going to a professional studio better than doing things at home. The environment which the recording, mixing, and mastering is occurring in is equally important, maybe even more important than the quality of the gear you are using. If you don’t want to be recording the sound of your neighbors fucking upstairs, traffic whizzing by outside, construction on the building next door, then you will need proper isolation and sound proofing in order to do so. Most of the time when people build their little home studio setups, they do so without thinking about the ramifications of properly isolating and sound proofing their recording space. If you can hear all these extra sounds coming into your home while your recording, that means the equipment you are using to record can pick it up too. So not only are you recording yourself but you are recording the environment around as well. In big music cities where opportunities for a music career actually exist, most people live inside apartments or condominiums. These apartments and condos are usually made out of various constructions of drywall and wooden frames, flooring and ceilings. Other weak points in construction also include entry ways, doors and windows. These weak points mean you’re going to get a lot of external ambience and noise coming into your apartment, as well as going out of your apartment. Isolating the space you record in Another thing that is important when it comes to the space the studio resides is acoustics. Most amateur home studio setups either incorporate no acoustic treatment at all, or the treatment that is done is very minimal and/or improperly done. This means you’re not just recording the source, but also recording the sound reflections of the room. In addition, it means the accuracy of the sound you are hearing coming out of your monitors will be low in quality, which even for the most experienced professional engineers could make it hard to produce a mix that translates over a number of different audio systems. The accuracy of the sound you are hearing is everything. Depending on what genre of music you are working on, the size of the studio could even be an issue. If you’re just recording vocals and producing beats on your computer then an average sized room should be sufficient. However, if you’re recording full bands, they’ll probably want to play and record their songs together. Most apartments and condos aren’t large enough to fit an entire band in to do a proper recording. In addition, your neighbors probably won’t be to happy with you either. THE EQUIPMENT When it comes down to the gear, most professional studios usually have amazing choices of gear thats way in excess of what most people have in their home studio setups. Choices in microphones, pre amps, outboard eq’s, dynamics processors, digital converters, effects, speakers and more can really define the quality of sound a recording studio can capture. Not withstanding, the divide between the home and professional studio market keeps shrinking. But still, the range of gear alone will most likely bump up the quality. When finding the right gear for the right application, the ability of the engineer to audition and select different equipment is essential in capturing the right color and timbre of the sound sources being recorded. The seasoned abilities of the audio engineer in addition to the combination of acoustics, isolation, and gear of a professional studio will produce a far greater quality than most people can get at home. This goes for most high and mid priced recording studios. Even if you purchase all the recording equipment in the world, you’ll more than likely still need a professional studio because that is in fact where professional audio engineers work out of. The main contrast between a serious home recording studio and a professional recording studio is most definitely the set of skills the audio engineer has. Based on that skill set, the difference between the end product produced is usually quite drastic. So in summary, after all the arguments i presented, is it wise to build a home recording studio if you’re a musician or recording artist? You’re probably thinking that because of the positive points i made about professional recording studios that my answer to that question would be no. But in all actuality, i definitely think it’s important for aspiring musicians and recording artists to have some kind of home studio setup. Why is that? For the benefits of songwriting and to help deliver confidence while performing when recording. Writing and performing in a professional studio under pressure can be quite stressful, and expensive. The more you write and rehearse at home, the less stressful going to a professional studio can be. Once again, what i always tell my clients is write, record and flesh out your ideas at home before you come into our studio to record them. This way, you’ll have a better concept of how you’ll wanna record your project since you’ll already know how your performances sound playing back through the speakers. Whether you’re a singer, rapper, or musician, having an idea of how things sound will help perfect your writing and performance of that writing before going to a professional studio. The only way to know how you sound and whether your ideas are good or not is by recording those ideas. Cause at the end of the day, how will you really know if what you wrote is good or not if you don’t hear it back after performing it? How will you know how to perfect and tweak what you wrote if you don’t hear it back? In the long run, this will only make you more prepared when coming to a professional studio such as ours to record.
Cole: I always gave into the concept that if you recorded at higher sample rates then it sounds better. Some people I considered to be good engineers actually said if you can record 96khz then do it. If you don’t mind me asking how did you come to the conclusion of keeping the sample rate of your sessions at 44.1khz instead of using higher sample rates like 48, 88.2, 96khz? From what I know, you can’t record both at 48khz and 44.1 at the same time so it would be a bit difficult to a-b the two right?
Its kinda difficult to explain and also really depends on what kind of project you are working on. Certainly their are situations that warrant recording at a higher sample rate. But, 90%-95% of the time when recording, especially in genres where live instrumentation isn’t really used or needed, it is better to remain at a sample rate of 44.1khz. To help explain, first, i think it’s best to fully understand what digital audio really is.
So, essentially you have to think of digital audio as the summation of a lot of math equations, those equations coming from the process of converting an analog signal to a digital signal or what is commonly known as A/D. The architecture of those equations are determined by both sample rate and bit depth, which i’ll explain shortly. The final sum of those equations (which we call an audio file) is never quite a perfect answer, its always some kind of number with a lot of decimal points to it.
What makes the math imperfect is the fact that the sum is usually a number that is a rounded result from all the equations occurring in the process to convert an analog signal to a digital signal. The accuracy of the mathematics occurring is determined by the quality of the A/D process done by a device called the A/D converter, which you would also know as your Audio Interface. Depending on the actual quality of your A/D converter, the amount of decimal points that the sum will assume can either be short or an extremely large value. Top of the line A/D converters, the ones that cost as much $12 grand and higher, round out the sum of these math equations to a trillion or more decimal places, which means the sum is going to be a lot lot more accurate and detailed. Low end A/D’s round out these equations to a few hundred or thousand decimal places, so the sum is just not going to be as accurate and detailed.
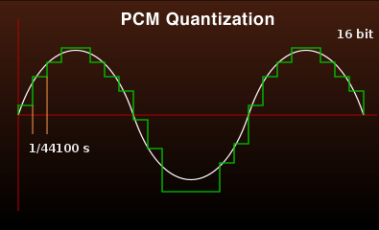
So what exactly is ‘the sample rate’? In a comparative ‘simple’ explanation, it essentially is a consecutive series of snap shots over a specific duration of time like a video or motion picture. But we’re not talking about video, we’re talking about audio. What defines the sample rate is how many of these snapshots of audio occur in the duration of 1 second as well as how consistent the interval between each snapshot is. So what 48 khz really means when you break that number down is that their is 48,000 snapshots of audio in 1 second. 44.1 khz means that their is 44,100 snap shots of audio in 1 second.
It’s also helpful to understand what ‘Bit Depth’ is as well in this conversation. Once again, to make a comparative ‘simple’ explanation, ‘Bit Depth’ represents how detailed each one of these snapshots are, kinda of like the amount of colors in a photograph. Black and white photos represent the lowest bit depth, and photos of many millions of color combinations represent the highest bit depths. Once again, since we’re not actually talking about photos, the details we are talking about in each snapshot of audio is decibel level steps in the frequency range of human hearing, which is between 20hz-18,00khz.
16 Bit audio has 65,536 steps while 24 Bit audio has 16,777,216 steps. Essentially, 24 Bit audio has 256 times the number of potential amplitude steps as 16 bit audio.
Now that we roughly know what digital audio, sample rate and bit depth are in terms of how they are defined, we can go back to your original question about why i mostly choose to record and work in a 44.1khz, 24 bit format as opposed to a higher sample rate and bit depth in our DAW.
You have to think of the A/D converter as essentially a sonic camera. You can kind of compare recording digital audio through different quality A/D converters to animating photographs from different kinds cameras. A really top end camera is going to take a high detailed snapshot, and obviously a cheaper consumer camera is going to take slightly less detailed snapshot. If you were to take 48000 snapshots in a row super quickly and animate those snapshots, its pretty clear that the animation of the snapshots from the top end camera is going to look way better than from the animation of the snapshots taken from the consumer camera. The same would apply if you were to take 44100 snapshots.
So now in the conversion process of converting audio from 48khz to 44.1khz, essentially we have to remove 3900 snapshots of audio to get from 48 kHz to 44.1 khz. But which snapshots are we going to remove? And when we remove those snapshots, what happens to all that extra space that was now created. The interval between each snapshot is not going to be consistent anymore. It would go something like, snapshot snapshot, missing snapshot, snapshot snapshot, missing snapshot instead of just snapshot after snapshot after snapshot. Because we had to remove those 3900 snapshots, if you were to animate the remaining 44100 snapshots back what you would see back is going to be less smooth and consistent. Totally not representative to what the animation of 48000 snapshots would look like because the intervals between snapshots wouldn’t be the same. So essentially converting audio down from 48khz to 44.1 means you are removing information from the 48khz file to make it a 44.1khz file. Anytime your removing information from an audio file like that, the end result is not going to be the same as the original audio file, even if its only the slightest of differences.
So thats why i keep everything at 44.1, so i’m not losing any tiny pieces of information from the audio file in the conversion process. Hope this is somewhat understandable.
Today, we are going to comment on a very common inquiry we get from many young producers who come through our studio in Chicago and book time. It is the question of whether it is useful or not to go to an audio school to pursue a career in music. With so much of the younger generation discovering a passion for music production (largely due to the affordability of powerful audio & production software), the natural move for a small percentage of them is to want to make a living engineering and producing music full time.
So just like many careers out there, the natural logic is to presume a degree is needed not only for the skill and insight but for the resume, proof of effort, etc. In addition, the idea of going to school to learn how to play around with mixing consoles, top end audio gear and microphones is pretty enticing. So if you’ve toyed around with these questions, let us give you a few thoughts to take into consideration. Remember, the ultimate decision though is up to you and no one else, don’t ever forget that.
No Degree Is Needed To Make A Living In Audio Engineering
We’ll just get right to the point here. No degree is needed to make a successful living recording, mixing, mastering, or producing music. As a matter of fact, it wouldn’t be all that shocking to discover that most of the top level audio engineers currently in the field didn’t go to school for a career in audio. It would even be fair to say that a decent amount didn’t even go to school at all.
Audio engineering and music production is not just a field of study. It is an artform, a craft. The typical method of training for a career in audio is an internship where an aspiring engineer learns and works under a seasoned audio engineer, studies and actively employs his or her techniques and philosophies in order to one day develop into a skilled successful engineer. Its been like this since the earliest days of recording. The two things that matter most in this business in order to induce ultra success are connections and experience. These days, one can go to any studio around the world, beg like a dog for an unpaid internship, and start the long and somewhat brutal process of planting one foot in the door. Of course you’ll make a lot of coffee, clean a lot of toilets and answer a lot of phones, but its all for that one day when you might be able to assist a session for the first time or be relied upon to edit some audio in Pro Tools before an important mix. Then before you know it, you’ll be sitting in more sessions, learning more techniques, asked to do more important things in order to make the engineer or engineers lives that you are interning under exponentially easier in the studio.
Go To School If You Can Pay
With all that was just previously said talking down the idea of going to school for audio engineering, a college education can be invaluable for an aspiring young engineer, giving you hands on experience with recording equipment and real world situations commonly found in most professional studios around the world. You see, its more than just recording and mixing. It’s learning the process to meet deadlines, proper session flow, understanding your clients or client psychology, the art of effective promotion, business management and so much more. Some of these things can be hard for an intern to learn in the studio. Having a firm grasp on all these concepts before beginning what is the usual mandatory internship makes it easier to get both feet in the door at a studio and thrown into everyday studio life.
The one unfortunate thing about going to school these days is the amount of money that one must shell out in order to get that piece of paper at the end that confirms you did it. So if you have the money to go or your family or relatives are willing to pay for it so you don’t have student loans, go to school, it would be silly not to. The amount of people you’ll meet, relationships you’ll develop, and life experiences you’ll have are ultimately important for personal growth and development. And you can apply these life lessons and relationships to the world of professional audio. Good people skills and relationships can lead to more networking, more networking can lead to more connections, and more connections can ultimately lead to more clients and business.
However, if you have to take out loans to go to school, it’s tough to advocate putting yourself in serious financial debt for a degree in audio. Why? At the end of the day, the sad fact is that even with an esteemed degree from a top college, you still have to be accepted into the school of ‘hard knocks’ as an intern in a recording studio. As we said before, the education should help give you a one up with your experience and knowledge over the rest of the interns. Engineers may turn to you more often to assist or sit in on their sessions, but that’s not always a guarantee. At the end, you’ll have to ask yourself if its really worth spending all that time and money on a degree only to do what you could have done for free without that certified piece of paper.
So in summary, going away to school for an education in audio is a great thing. As we said before, the relationships you’ll build and life experiences you’ll have are not only important for self-development and growth, but they will also help out in the real world environment of professional audio. However, not going to school shouldn’t be the excuse one uses for not pursuing a career audio engineering. Going back, most top-level engineers didn’t go to school for audio. They got in the door and advanced their careers because of their motivation, dedication, hard work ethic, reliability, and personality. They also advanced their careers because of their extraordinary hearing abilities. All these qualities are vitally important in the profession of audio engineering and can’t necessarily be learned in school. Plus, a seasoned engineer might be more willing to take a chance on a person with these qualities versus someone with a degree. You’ll never know though until you give it a try.